Header

Header

Monday, 2 May 2022

Numidian Cavalry Reworked


It's always a joy to find untouched, unpainted, pristine Minifigs castings from the early 70's. Sadly, it's a rare pleasure, and most of the time we are dealing with models that have been... as folks say these days... 'pre-loved'. 

I bought a batch of twenty or so Numidian cavalry from e-bay recently and thought I'd have a go at tickling a few of them into life, rather than stripping the models back to bare metal. I have quite a few of these figures in bare metal already. I'm determined to paint more this year than I 'unpaint' as it were, so these presented themselves as likely candidates for some restorative work. 

The rider is PBC 46 and the models came with a mix of the PB series and later 'A' series Numidian ponies. The chap here is riding the later pony. Neigh I say! Every one a whinny! That's enough horse jokes for now - Ed.


Before - Numidians looking a little battle-worn but still up for a fight! 


I've photographed six of the models as they arrived - not exactly the six I completed because I'd already started a couple by the time I got round to putting them under the camera, but typical of the general appearance and condition. And here they are suitably enlivened with a bit of paint, new bases and straightened spears. 


After - Numidians now ready to hunt down a few Romans for tea.


It's always a tussle with 70s paint jobs and a lot depends on how well the figures have been cleaned up to start with  and how generously they've been  favoured with Humbrol enamel and gloss varnish. A layer of matte Humbrol can make a good base to work from if it's not too flaky or grubby. Varnish, though, is a bit of a challenge. Do you preserve a basically alright paint job by over-painting the varnish, or just give up and strip the castings back to bare metal? Over-painting the vanish is always a compromise. What detail there is will start to disappear under the multiple layers of paint, varnish, more paint, and... yes more varnish. In this case the models started off fairly heavily varnished - ho hum. 

After giving everything a good dust with a stiff paint brush, I removed the old bases and the glue with which they'd been stuck on - basic knife and file stuff. I then checked the riders to make sure they were sat on the horses properly. A few were - but all those riding the PB ponies were sat way too far back, and one of the others was positively oozing with whatever had been used to fix the riders to their mounts. It looked like Araldite epoxy or some such stuff. I removed the riders and cleaned up the glue - needle nose pliers useful for this. I then discovered why the original owner had put the riders where they had: the ponies are so barrel-chested the riders simply didn't fit anywhere else. So, all had to be filed to fit. At the same time I filed off a few mould lines from the horses' rumps and cleaned up some typical casting clag from the inside of the legs.

All of which played havoc with the paint of course. I spot primed where necessary and then painted to match the original colour as best I could. Similarly, with the riders, where the legs and tunic had lost paint, all spot primed and painted fairly close to the original colour - it would all get over-painted anyway so no need for an exact match. The spears were all straightened out - flat noses plies are invaluable for this - and then scraped and filed clean and spot primed. The original paint and varnish had already flaked off where the spears had bent over the years. I know from past experience, there's no point in trying to work with it - easier to just remove the paint mechanically and start again. I did the same for one of the shields because it was a different and rather unattractive colour. Otherwise, I left the paint as it was to serve as a base. 

The riders previously removed from their mounts were reunited using superglue or greenstuff epoxy putty. I often use greenstuff where the rider doesn't fit very snuggly because it fills in the gaps a little, and you can adjust the sit of the model more easily than you can with superglue. Where the greenstuff was visible I went in with a bit of black paint to cover it over. 

Ready for paint - and I started off the horses with a bit of highlighting in a suitable colour, a few touches of white, and painting the hooves. The riders got a new skin colour - a mix of flesh and a red-brown over the original very dark skin colour. Numidians were Berbers - the same people as native Libyans and Moors - and I usually paint them a deep flesh colour. Mine arrived with very dark skin, which I used as a base to work over, leaving the original colour as the darkest layer. I then gave it all a coat of flesh wash. The tunics were treated the same way, over-painted in a lighter shade leaving the original colour in the recesses. In the 70s all spears were dark brown - it's a fact - I don't know why. I painted them a lighter colour as I usually do. The shields were highlighted at the edges. I then black-lined the whole thing - dotting in the horses' eyes while I was about it. Black lining is a bit fiddly but it very much defines the old-school 'look' and is well worth the effort. 

New bases - all cut from mounting board - and bases painted green. The green looks a little more garish in photos than in real life - only a bit though! Just as all 70s spears were dark brown all bases were that ghastly dark green colour that just sucks the life out of even the best paint job. And that's it - six figures - a small unit for my Carthaginians. 


Tuesday, 12 April 2022

British Infantryman (161)


This is the British Infantryman that first appeared in the Miniature Figurines 72/73 catalogue as PB 161. The same title is given to a second figure PB 162, hence I've added the number to the title to avoid confusion.

Both PB ranges were based on Phil Barker's books Armies of the Macedonian and Punic Wars and The Armies and Enemies of Imperial Rome. This figure is taken from illustration 61 in the first edition of AEIR.

The code numbers for the AEIR range correspond to the illustrations in the book plus '100', i.e. illustration 1 is figure 101. 

The base is stamped PB 161 on the upper surface in the usual manner.

Strictly speaking this warrior is a Briton although the model would serve perfectly well as a Gaul or German and will probably sneak his way into my Carthaginian army in the guise of a Celtiberean. 


Legionarius, Early 1st century AD


This is the Roman Legionarius of the early 1st century AD that first appeared in the Miniature Figurines 72/73 catalogue as PB 105.

Both PB ranges were based on Phil Barker's books Armies of the Macedonian and Punic Wars and Armies and Enemies of Imperial Rome. This figure is taken from illustration 5 in AEIR and, like all of this range, the Minifigs code corresponds to the illustration number plus 100.

The base is stamped PB 105 on the upper surface in the usual manner.

The illustration is based on the tombstone of Caius Valerius Crispus and the description follows a rather dated assumption that the armour is made of leather. Hence the model's armour consists of a featureless breast plate and shoulder pieces.

H Russell Robinson shows the relief in The Armour of Imperial Rome, points out that is is badly worn, and goes on to identify the armour as mail - hamata. My own way round this is to paint on the mail as best as can be managed. 

Aside from that he's a neat little figure that makes an impressive cohort from the time of Tiberius and Germanicus. 


Photographing Shiny

I recently painted and photographed a few sample figures, including some of the Minifigs Mythical (i.e. Middle) Earth ME range. These being Wood Elves and Rangers there was quite a bit of green in various shades. By the time these had been varnished I thought the photographs didn't really do them justice, and wondered if this was more to do with the colours than anything. Of course, it is far easier to photograph a flat or matte painted model, so I thought I'd experiment with another sample figure I've finished. This is a Minifigs Spanish Scutarius from the Armies of the Macedonian and Punic Wars range. 

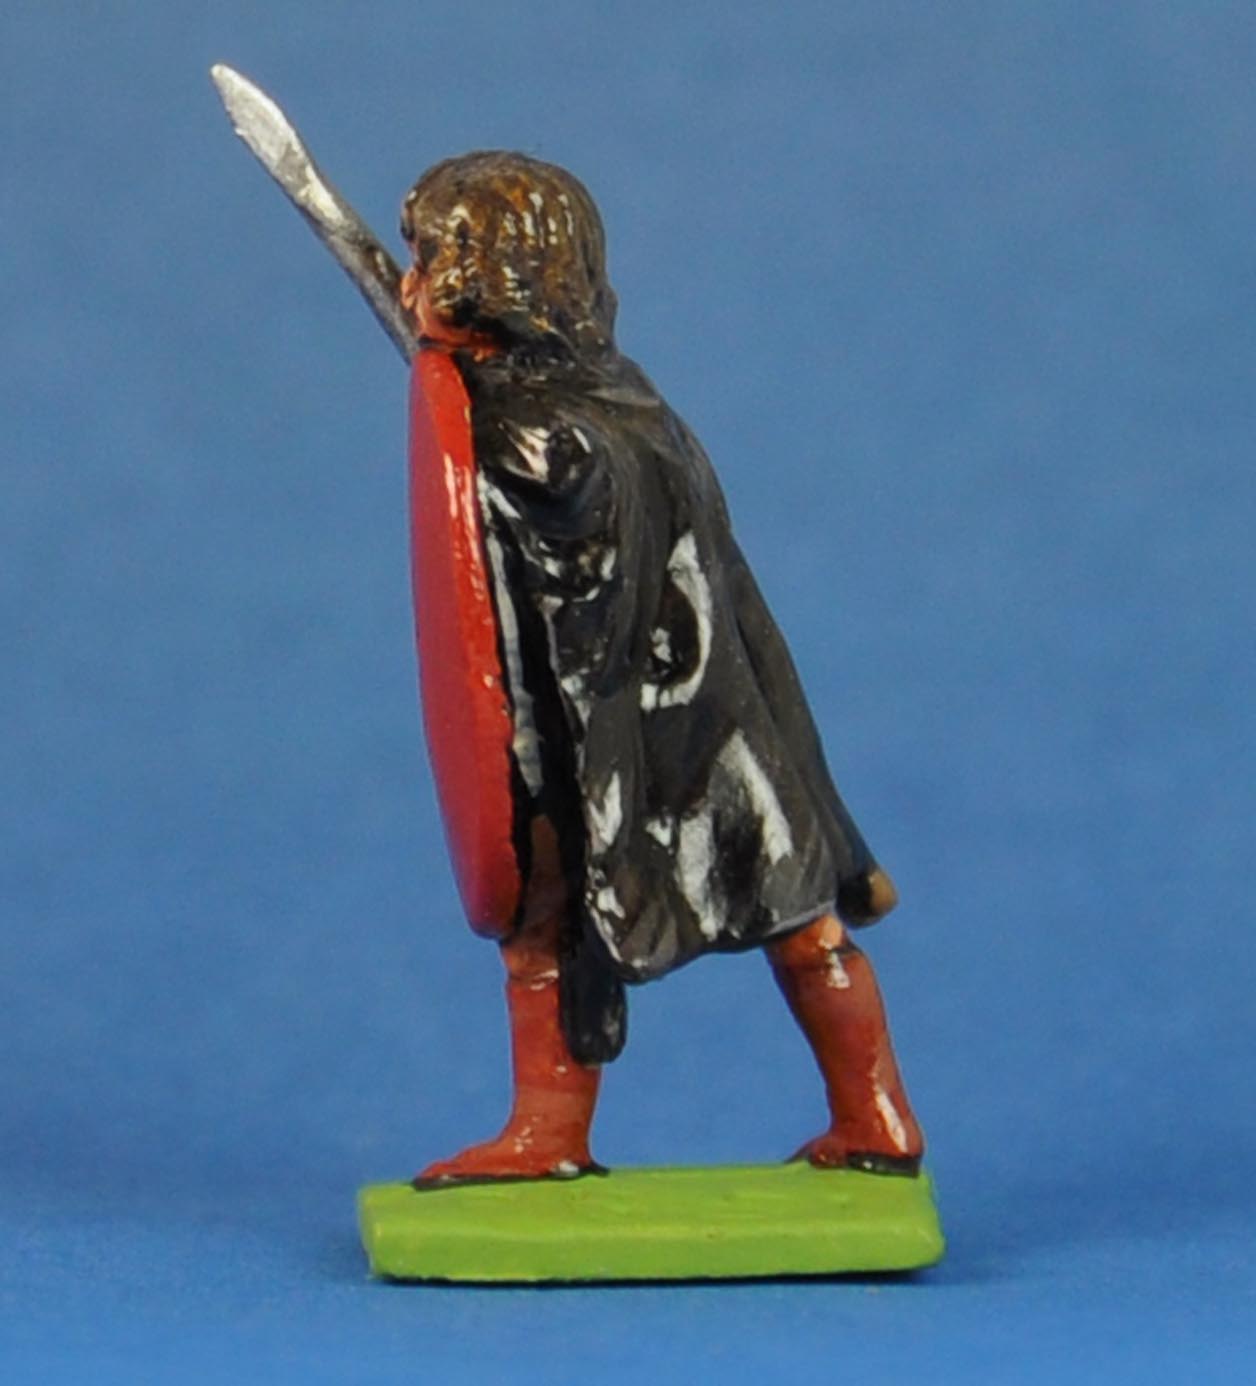
A distinguishing feature of these troops is the black cloak, not an easy colour to paint or photograph. My preference here is to work the black up with a little brown, hatchuring the paint rather than blending it in, and then catch the edges with a light shade. It's not a complicated little model and I've painted it as I would a unit of figures of this type. I've left the shield a single colour with the intention of maybe adding a transfer should I get a unit together.

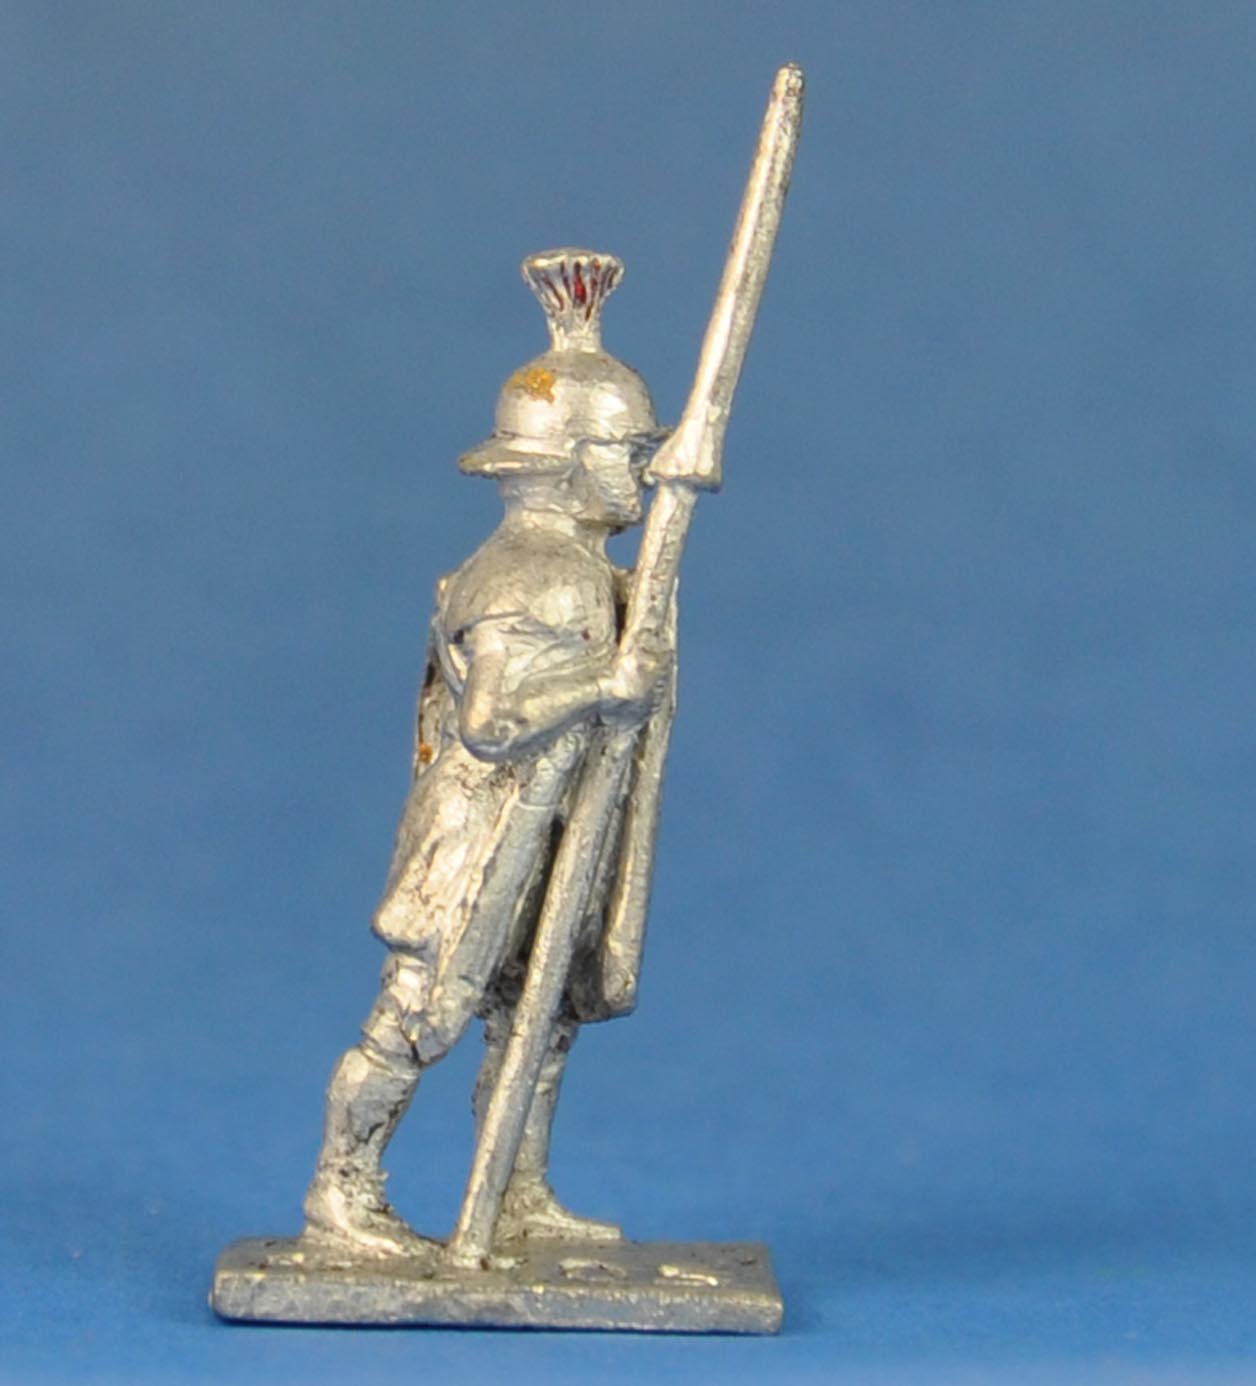
The picture at the top is the unvarnished version, whilst the picture underneath is the same figure with a layer of water-based gloss varnish.  


As with any photo of a varnished figure you can see the reflective highlights. It's very hard to avoid this and, to be honest. when you're looking at a unit or several units on a battlefield the effect is very pleasing. 

Notice the warrior is armed with a heavy javelin in the fashion of a pilum, with a long iron-shanked point. His sword is on the far side. 


From this angle you can see how the folds of the cloak reflect the light. You can also see something of the highlighting on the unvarnished version, but this is practically indistinguishable on the photograph of the varnished model. 

The effect is less extreme in reality than it appears, but I think it suggests I should go for more contrast. With black it's always tricky because the more you highlight the less black it gets! 


From the back you can see the effect a little more clearly, again the top picture is the unvarnished model and the bottom one is the same figure varnished. 


This is the same deal from the front of the model. As you can see he has what is supposed to be a Celtic style of shield with a central rib or boss. This seems to have been translated into a flat shield that looks more like a Greek thureos. On the plus side it will take a transfer or a painted emblem well! 


And by way of comparison this is a figure that was painted and coated with an old fashioned polyurethane varnish thirty odd years ago. Must get round to finishing that army sometime!

The figure is one of a small range I made and which Wargames Foundry cast up for me - this chap has been heavily converted to boot.

I think the varnish is definitely 'shinier' than the water-based version and undoubtedly tougher too. I still use it occasionally, but it takes forever to dry compared to the water-based version and the fumes are something else! 


Thursday, 31 March 2022

Spanish Scutarius


This is the Spanish Scutarius that first appeared in the Miniature Figurines 72/73 catalogue as PB 51s and subsequently in the 75 catalogue as PB 51.

Both PB ranges were based on Phil Barker's books Armies of the Macedonian and Punic Wars and Armies and Enemies of Imperial Rome. This figure is taken from illustration 51 in AMPW.

The 's' designation was used to distinguish the newer 25mm style of models from the preceding, smaller 1/72nd range. The transition was soon complete and the 's' - special - was dropped from the figure codes thereafter. 

The base is stamped PB 51 on the upper surface in the usual manner.

The weapon carried by this figure is the Spanish version of the pilum - the top section is metal, although often seen painted as a spear. 

Otherwise, this is a very simple figure, and one that appeared in many Carthaginian armies when current. 

Sunday, 27 March 2022

More on the to do list

A few more samples figures completed this week including this rather nice Southern Gaulish warrior from the Armies of the Macedonian and Punic Wars '72 PB range. Unusually dynamic for a Minifigs model and sporting a haircut that would not look out of place on a woodwork teacher circa 1976. 

I have a smallish unit of these that needs a strip and repaint. One for the back burner I feel. As you see, I'm not terribly hot on stripes and checks and tartan all that guff when it comes to Celts. I've stuck to a plain colour in a shade that suggests a natural dye. It may be a little boring but at least they are saved the indignity of looking like a touring Rugby team. 

This fellow is from the Mythical Earth (ME) range - an Ithilien Ranger in fact. I've been collecting the ME range alongside the various ancients ranges for a good few years. 

The ME range is covered pretty well on the Lost Minis Wiki website along with the other Minifigs fantasy and SF ranges from the 70s, so I won't worry about doing any bare metal photography for these.

You can still buy many of the models from this range as part of the Minfigs Classic Fantasy re-issues, and more are being added every so often. 

This is his friend - there are only two Ithilien Ranger models in the range the archer and this spearman. As usual I have given them a coat of gloss varnish - I might try photographing before varnishing next time as I think that would show the highlights off better. 


The Wood Elf archer figure from the ME range is a wee chap even by the standards of mid-70's 25mm figures - I make him a tad under 24mm tall. Note the pixie boots - nice. 
I took a few shots of this model because it was hard to find an angle that showed him off properly. 
I've based all of these Minifigs onto what would have been 'light medium infantry' bases - 20mm frontage and 30mm depth - according to the WRG rules that were current at the time. They also had 'light heavy' infantry. I kid you not. 


While we're at it, this was the first advert for the ME range from the November 1973 Military Modelling. 

Note that the code numbers for the Dragon, Nazgul and Eagle are not as they ended up. If interested, check the 'pages' section to the right, where you'll find a scan of the 1975 catalogue, which includes the full range. 


And the review of the first releases. This is as good as you got when it came to knowing what is was you were buying at the time. I feel the 'Three Yorkshiremen Sketch' coming on, so I'll stop now and spare you that.... and you tell that to kids today... arghh... Nurse! 

Wednesday, 23 March 2022

Carthaginian Cavalry


Back in January I painted a few samples of work in progress including a Carthaginian cavalry figure. Here is the unit finished at last and ready to join my growing Minifgs 72 range (PB) Carthaginians. 

I do like the first PBH horses that were made to go with this range. These were soon replaced by the larger A and H series horses, which I don't think suit the riders anywhere near as well. Whenever I can I like to use the PBH horses for the 72 range riders.

As you can see I've gone for simple toy soldier style basing onto card, a nod to the style of the day. The same goes for the gloss varnish, which was of course standard at the time. I like the way the varnish enhances the colours, even if the primary reason is to make the figures handleable. 

I have parted company with tradition by using transfers for the shields - these are part of the Hoplite set from Warlord Games. It's a very useful set of transfers - or decals if you prefer - even if you do have to get a dozen or so sheets if you want all your shields the same like me. 

These took me a fair while to finish - it's all those horses! - and I'm looking forward to getting on with something a bit quicker next time.

Interesting observation. I scraped the riders together from several ebay purchases and it was only once I started to mount them that I discovered some are slightly smaller and more slender than others. Presumably, these come from different moulds, but the result is that the spears on some are at slightly different angles - not so much as you would notice at first glance but definitely there. Some of the spears are also slightly thicker - just goes to show how much variation you can get off a mould even with the same model.